Monday 28 September 2009
A Experiment with The Green Screen
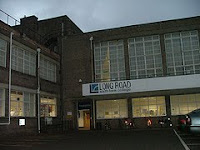
We choose this Longroad image from the website Flickr and we edited this in photoshop.


This the Uploaded version one with no effect used.
This is the uploaded version where I used the effect sepia.
This is the greenscreen and the treadmill in the gym, and there is the camera and the lights.
As a class we filmed volunteers who wanted to walk on the treadmill in the Gym in front of the green screen. we all had a chance to take a role such as operating the camera and lighting. I took the role of lighting and camera for a short time.
After editing the Longroad image on photoshop this is what my finished results looked like:
After I edited the Longroad image On final Cut Express I edited. This is my Finished Version.
I done Two one is in Sepia effect I made two copies because I thought they both looked effective.
This the Uploaded version one with no effect used.
This is the uploaded version where I used the effect sepia.
add video
My animated Production Logo

I have decided to choice a image of an elephant as they are animals that play a major part of my interest, Using this image of this sketched elephant I have edited it in photoshop.
My objective is to animate this image of the elephant and have it represent Alison's productions.
I was shown how to cut out the legs of the image and then rub out any unwanted outlines. Then using transform and selecting rotate you can move the images of the legs and position them to where the leg would move to if walking. After this was finished it was imported to final cut express from photoshop then put together as a sequence. After ti was edited in Final Cut express the animated effect worked and the elephant walks along.
I used a blurred effect in settings on photoshop which gave this elephant a shadowed effect to its shape. I outlined the elephants shape with a paint brush (small: 1) to give it more characteristics of a cartoony sketch.
Draft of My opie

I have began to design a opie of myself on photoshop. I used the pen tool and using the tool I cut around the shapes of my head and neck and facial features.
This is a draft version of my opie I have not completed it. I need to paint my hair with colour and my facial features and pen tool the neck. I need to change the colour of the the face and background.
Sunday 27 September 2009
Case study of a film
Task One


Lord Of War
Opening Titles
Titles:
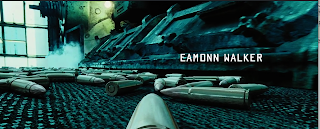
In these screen grab shots I have selected from the opening of the film Lord Of War the imagery is focused on the positioning of the bullet and the titles. As you can the titles trace the movement of the bullet when the bullet is laying vertical you will notice the titles are on the right side of the screen moving forward. when the bullet has been picked up and placed back on the conveyer belt, a short moment after this you can see the title is still on the right hand still however the title has followed the tip of the bullet. The font used for these titles is set to be as a russian type theme also the font follows the characteristics of the tall and narrow bullet.
Audience Interest:
Throughout this opening the camera shots used give the impression you are the bullet. Focusing on the action in front leads you and the bullet in a journey through the factory and transportation to the war field where then the bullet (seen as you) are then fired into a character.
Music:
Opening sequence is filmed on the song "For What It's Worth" by Buffalo Springfield.
The music used for this film opening is representative of the footage seen both preparation and during the war.
The lyrics "stop hey whats that sound" brings the audience closer to the action and provokes the audience to imagine what the war could be like later on in the film. It creates a jolly effect in the opening. This music track being non diegetic is being accompanied by the diegetic sounds such as the bullets rattling and the machinery and sound of transportation. This in turn helps to build tension in the film opening.
Main character:
There is no apparent main characters within this opening sequence apart from the bullet and the workers in the factory and transport. Although you are introduced to a character at the end which sends of the message about why that bullet was made for the first place which was war hence the title Lord Of War. So this introduces the audience to a possible character who will likely be appearing later on in the film, This character being' The Lord Of War.
Settings and Lighting:
At the start of the film opening the setting is in a dark factory which makes it seem like a dark film, also the gritty factory setting which shows the audience it may be a war film or a industrial film also it seems. However later on in the film opening as the bullet gets further into the journey it lightens up gradually until eventually the bullet reaches its destination the scene lightens completely, this creates tension to not only the bullet but the environment around it. This clearly suggest it is a war type environment.
Introduction to Action and Story:
When the film opens you can suggest that the film will be a dark film with violence, it tells you that the film is about war and the action introduced. The story line beings with no decision of what the bullet plays a role as but when the bullet if fired then the story has been showed. It shows this film will be about the dealing/ selling of arms and weapons during the war times.
Studio, Production company, Distributor:
Although there is no is no visible distributor or production company or studio I did a bit of background research and found out that lion gate was the distributor for this film 20th century fox provided the post production facilities for the making of this film. As for the other things I am not to sure as they do not appear on the opening titles of this film.
Job Titles - Producer, director, editor, etc..:
There are many names that appear within this opening sequence such as the actors and people that work within other roles such as director or producer. The first name the audience is shown is the lead character / actor whom is Nicolas Cage, this shows the audience that he is obviously going to play the lead character within this film.
Here is a list of the other cast who acted in this film:
- Nicolas Cage – Yuri Orlov
- Bridget Moynahan – Ava Fontaine Orlov
- Jared Leto – Vitaly Orlov
- Ethan Hawke – Jack Valentine
- Eamonn Walker – André Baptiste Sr.
- Ian Holm – Simeon Weisz
- Sammi Rotibi – André Baptiste Jr.
- Yevgeni Lazarev – Gen. Dmitri Orlov
This film was written and directed by Andrew Niccol
Here is a link which will show you a full list of producers, makeup artists, stunt coordinators and many more...
Links to information on Juno
Task Two


These shots in juno are the ones that I shot in my remake Juno opening sequence.


I think that my shots are effective and has reflected the Juno shots really well. Me and my group captured the scenery and location and used the correct props for these shots.

Tuesday 22 September 2009
Editing Juno
My Planning for Juno
Story Board and Camera Shots and Locations
Location- music room windows of guitars
camera work - Medium shot

Location - outside music room + path
Camera work- Longshot

Location - outside the school
Camera work- medium shot

Location- gate outside the school
Camera work- Long shot

Location- field
Camera work- mid shot

Location - Quad or field
Camera Shot- mid shot

Location-
camera shot medium shot

Location- car park
camera shot- Long shot

Location _ anywhere in front of a wall
Camera shot- Close up.

Location- Houses in the background (field)
Camera Shot- long shot or medium shot
Props - plastic bottle
Location - filmed in front of houses.
camera Shot- Medium shot
Props - red and yellow, and plastic bottle

My filming group consisted of Tom, Charna and Alex. Our task was to film and remake the opening of the film Juno.
I screengrabbed the shots and wrote down how long each shot last for and the camera movement. We searched for locations to film and then followed the storyboard and filmed the shots.
I took the role of acting the character Juno and was filmed by my group. They directed me where to walk to and how and how long for. The storyboard helped us to imagine the shots and what direction to focus the camera at. (different angles)
Once shooting the footage for the remake of Juno's film opening I edited the footage on Final Cut Express and the music from the Juno's opening and changed the effects for the footage.
Effects:
I used the effect Sharpen which gave the footage cartoon imagery, I did this because it was similar to the film Juno.I used page peel which is a effect for titles, this peels the title from the page. I faded out the music at the ending and the singing voice faintly drifts out.I added titles such as editors,producers,and who it is by. Then exported the film opening ready to view on youtube.
I am pleased with the editing and how the music brings the opening more lively and entertaining. I think some of the shots could have been thought more of and in position and better chosen locations. The shot where I am holding the wrong prop and instead it was shot of me holding the shot list. I should of been holding the bottle.
Feedback
Overall feedback was good however the actor looked directly at the camera now and again. The editing could of been improved to give it a more of cartoon look.
Monday 21 September 2009
PhotoShop Lecture on how to create the effect of the film Juno
Having an hour and a half's lecture on more photoshop tools has helped me to understand how to use photoshop and how to present my work more effectively.
Task: To download the LongRoad image from Flickr and to open in photoshop and then edit the image in the Juno effect.
I downloaded the longroad image and then edited it on photoshop given by these instructions which I noted down for future reference.
Photoshop tools I studied:
1. open your image in to Photoshop
2. Select pen tool and highlight paths
3. select one section of the image using the pen tool join up the dots around the shape of the longroad building (or any image you choose)
4. Keep creating a new layer for each whole highlighted shape in the image. (repetitive)
5. Choosing the Brush tool and selecting the pencil tool = diameter 9 ' (black colour)
6. select the pen tool on the image the use (control) and choose in menu stroke path then select pencil.
(This will highlight your image outline.)
7. choose new (graph paper)
Width = 20 pixels
Height = 20 pixels
Resolution = 72
( A small page will appear with a small sized small)
8. selecting the box choose select all , edit and stroke, then choose colour (centre) this highlights the image around the points and lines.
9. Edit define pattern
10. Control fill path on image
11. choose the grid
12. select all paths (layers) with stroke and pencil then use the paint bucket and fill in the image with paint.
13. final = layer style option Bevel and Emboss.
Finishing Touches
Copy the Longroad logo and paste onto the cartoon effected longroad building.
Feedback
Well done Ali! A very detailed blog with just the right kinds of analysis. excellent detail on photoshop techniques used in the postcard and lots of good analysis of Touch of Evil and of Kirk's film.
Pete
Pete
Saturday 19 September 2009
After having a lecture of how to use a small area of tools on photoshop we was given a task to create independetly a post card for the Creative and Media Diploma.
This image I used from Flickr because I feel it relates to the new courses growth and the potential creativity.

This is my final post card
This image I used from Flickr because I feel it relates to the new courses growth and the potential creativity.

This is my final post card

This image I used from flickr was photographed at Aldubourgh during a creative and media filming trip.

I took notes on what tools to use on Photoshop:
All the tools I learnt and used on Photo Shop:
Preset custom
Width 14.7
Height 10.6
Resolution 200
Scale size:
Edit - Transform-Scale
Image Adjustments
Colour levels (I used this tool to change the levels of projected colour in the images.)
Magic tool
(Command D)
Rubber tool ( I used to smooth the edges on the shell image.
Layer Style for fonts
Layer rastorize -type of colour and layer
Review on a student film opening
Task: Identify strengths and weaknesses from production.
In this student film opening
Strengths:
1. The music has a tapping rhythm that repeats throughout which draws the viewer in.
2. The chosen photography has been selected with detail
3. The film opening indicates the main character and gives the impression of the main setting and could possibley be a school.
4. Editing is effective using fades and zooms.
Weaknesses:
1.Titles need to be larger in size and a bolder font.
2. Lighting (scenes are darker than other scenes)
Review on Film Openings
Task: A review of the film openings.
Touch of Evil Opening Shot
The famous crane shot from Orson Welles' 1958 film, 'Touch of Evil.' The opening shot of the Touch of Evil was interesting in how there was so much diversed activity surrounding the streets. The atmosphere in this shot sets a civilized environment. The most common camera shots used in the opening are long shots and medium shots towards the ending. There is a close up at the start that indicates the importance of the bomb. This scene is one whole scene that has been recorded with no pausing. The camera just follows the charatcters infront of them portraying their costumes and the setting behind them. The filming is in blackwhite and the lighting projected in this scene is directed from car headlights and street lights also resturants and shops located in the towns highstreet. The music genre chosen is Jazz which sets the feeling of social events amoungst the selected characters. There are sound effects of people having faint conversations passing by the main characters. This scene can indicate the mistakes clearly through watching the opening more than twice. Such as the characters scripted lines, they speak to soon before the footage lines up with the actions. At the end of the opening sequence they use pyro techniques because of the period of the time compared to modernized productions which use high defintion editing and special effects. There are special sound effects for the bomb that creates painc to the audience.
I looked at the opening scene A New Hope which is a Star Wars film. This opening to the film begins with scrolling yellow titles on a black background, it begins with a story to set the atmosphere and the plot of the film and gives description of the main characters and spaceships. This film opening compared to Touch of Evil uses mostly titles for a longtime at the start then footage is shown as the film opens in a spaceship with special effect. Comparing this to Touch of Evil this film opening is very basic with the editing and effects. You can understand how techonology has improved over period of time. The soundtrack to the film opening has a herioc feel to the genre. There are sound effects of the shooting between characters having a spaceship war.
The opening scene to contact has this radio transmitted sound effect while there is special effected footage of planets, stars and galaxys. The camera work uses a lot fast medium paste longshots, the lighting of the stars fading out in to the distance and the colours used in description of the planets create attention from the audience.
Friday 18 September 2009
We watched a film opening to give us a idea of how to layout our titles and footage.
As a pair with Alex the task was to learn how to edit on final cut express by experimenting with small footage. Being familiar with Final Cut Express I was able to show my partner other tools. We editited the footage and used earthquake effects which created the footage to have atmosphere. Using titles we used this tool that we directed in movement where we wanted our title to move to above the footage.
Tools we used:
Razor (which cuts footage)
Pen tool (Fades the footage)
Effects (effects for footage)
Titles
Pie Chart
 Here is a Pie Chart that represents my life and the percentage of time I spend doing.
 My pie chart is based around Writing, College, Social Life, Animals, Instruments. (25%) for each activity.
In conclusion I decided I spend equal amount of time.
This task helped to remind me how to use keynote a program which you can produce formal presentations.
This task helped to remind me how to use keynote a program which you can produce formal presentations.
This activity was helpful to know bit more about the new class and me and charna made these pie charts in keynote a program that you can use to create good slide presentations.
Tuesday 15 September 2009
A moodboard on the film Shifty

For one introduction lesson the activity was to create tow images into one effective image. We used an eye and the earth and I edited it to make the earth inside the eye like a eye ball. Then I added a special effect to give the eye sharp colorful glow.


Saturday 5 September 2009
Subscribe to:
Posts (Atom)